A good microphone can instantly improve your streaming, podcast, or YouTube videos, but buying a quality microphone is only the first step. Many people spend money on better audio equipment and still end up with poor sound because the microphone placement and setup are not right.
Affiliate Disclaimer
This website participates in affiliate programs. We may earn a commission
when you purchase products through links on this page, at no additional
cost to you. Our recommendations are based on independent research and
honest opinions.
The way you position your microphone, adjust your settings, control background noise, and use accessories like a stand or pop filter can have a bigger impact than many technical upgrades.
Whether you are recording your first podcast, starting a YouTube channel, or streaming games and live content, a proper microphone setup helps your voice sound clearer, more consistent, and more professional.
In this guide, I’ll walk through how to set up a microphone step by step, explain the mistakes beginners often make, and look at two microphone stands that can make your recording setup easier and more comfortable.
Why Microphone Setup Matters More Than You Think
A microphone does not automatically create great audio.
The microphone only captures sound. The quality of that recording depends on several other factors, including your distance from the microphone, room conditions, and how stable your setup is.
For example, a good microphone placed too far away may capture more room noise than your actual voice. A microphone positioned too close may create harsh breathing sounds or distorted audio.
A proper setup helps you achieve:
- Clearer voice recordings.
- Lower background noise.
- More consistent volume.
- Fewer distractions while recording.
- A more comfortable workflow.
This is why professional creators pay attention to microphone placement and accessories, not just the microphone itself.
Step 1: Choose the Right Microphone Position
The first step is deciding where your microphone should sit.
For most podcasting, streaming, and YouTube setups, the microphone should be close enough to capture your voice clearly but far enough away to avoid unwanted sounds.
A good starting point is keeping the microphone around 6 to 12 inches away from your mouth.
Your exact distance depends on the microphone type.
Dynamic microphones usually work best when you speak closer to them. USB condenser microphones may allow slightly more distance but can pick up more room sound.
The goal is simple: your voice should be louder and clearer than everything else around you.
Step 2: Place the Microphone at the Correct Angle
Microphone direction matters.
Many beginners speak directly into the wrong part of the microphone or place it at an awkward angle.
For most microphones:
- Point the front of the microphone toward your mouth.
- Avoid speaking directly into the top unless the microphone is designed for that.
- Keep the microphone slightly to the side if you want to reduce breathing sounds.
A small angle adjustment can make your recording sound much smoother.
Step 3: Adjust Your Microphone Height
Your microphone should be positioned comfortably.
You should not have to bend toward the microphone while recording because this can create an uncomfortable posture and inconsistent audio.
A good setup allows you to:
- Sit naturally.
- Keep your shoulders relaxed.
- Maintain the same distance from the microphone.
This is where a microphone stand or boom arm becomes useful. It lets you position the microphone exactly where you need it.
Step 4: Set the Correct Gain Level
Gain controls how sensitive your microphone is.
Many beginners make the mistake of increasing gain too much because they want a louder recording.
However, too much gain can introduce:
- Background noise.
- Keyboard sounds.
- Fan noise.
- Room echoes.
A better approach is to speak naturally and adjust the gain until your voice is clear without reaching the maximum level.
During testing, speak at the same volume you will use during your actual recording.
Step 5: Use a Pop Filter to Reduce Harsh Sounds
Certain sounds create strong bursts of air that microphones capture as unpleasant noises.
These are usually caused by words containing:
- P sounds.
- B sounds.
- T sounds.
A pop filter creates a barrier between your voice and the microphone, reducing these sudden air movements.
It is especially useful for:
- Podcasts.
- Voice-over work.
- Streaming.
- YouTube videos.
A pop filter is a small accessory, but it can noticeably improve vocal quality.
Step 6: Reduce Vibrations With a Shock Mount
Your desk can create unexpected noise.
Small movements like:
- Typing.
- Touching the desk.
- Moving equipment.
- Adjusting your chair.
can create vibrations that travel into the microphone.
A shock mount helps isolate the microphone from these movements.
This is especially useful for creators who record from a desk setup.
Step 7: Improve Your Recording Environment
You do not need a professional studio to get good audio.
Small changes can make a big difference.
Try to:
- Avoid empty rooms with lots of hard surfaces.
- Add soft furniture, curtains, or rugs.
- Keep noisy electronics away.
- Close windows when recording.
- Reduce background distractions.
The microphone captures your environment, so improving the space around you improves your audio.
Step 8: Test Before Recording
Before starting a podcast episode or livestream, always do a short test.
Check:
- Voice volume.
- Background noise.
- Microphone position.
- Breathing sounds.
- Any unwanted vibrations.
A 30-second test can save you from discovering problems after recording an entire session.
Why a Microphone Stand, or Boom Arm, Makes a Difference
Many creators start by placing a microphone directly on their desk.
This works, but it is not always the best long-term solution.
A dedicated microphone stand gives you more control over placement and keeps your workspace cleaner.
It helps you:
- Position the microphone closer.
- Adjust height easily.
- Reduce desk vibrations.
- Create a more comfortable recording setup.
A good stand is not just an accessory. It becomes part of your recording workflow.
Choosing Between a Desktop Stand and Boom Arm
There are two common microphone stand styles.
Desktop Microphone Stand
A desktop stand sits directly on your desk.
It is useful for:
- Small recording spaces.
- Simple podcast setups.
- Online meetings.
- Beginner creators.
The advantage is simplicity. You can place it anywhere without installing anything.
Boom Arm
A boom arm attaches to the edge of your desk and extends toward you.
It is useful for:
- Streaming setups.
- Professional-looking desks.
- Long recording sessions.
The advantage is flexibility. You can move the microphone closer when recording and move it away when you are not using it.
Finding the Right Microphone Stand for Your Setup
Once your microphone is positioned correctly, the next step is choosing a stand that matches your workflow.
Some creators need a simple desktop setup. Others need a flexible arm that keeps the desk clear and allows more movement.
The two options below are designed for different recording styles.
1
BILIONE Versatile Desktop Microphone Stand: A Simple All-in-One Setup for Beginners
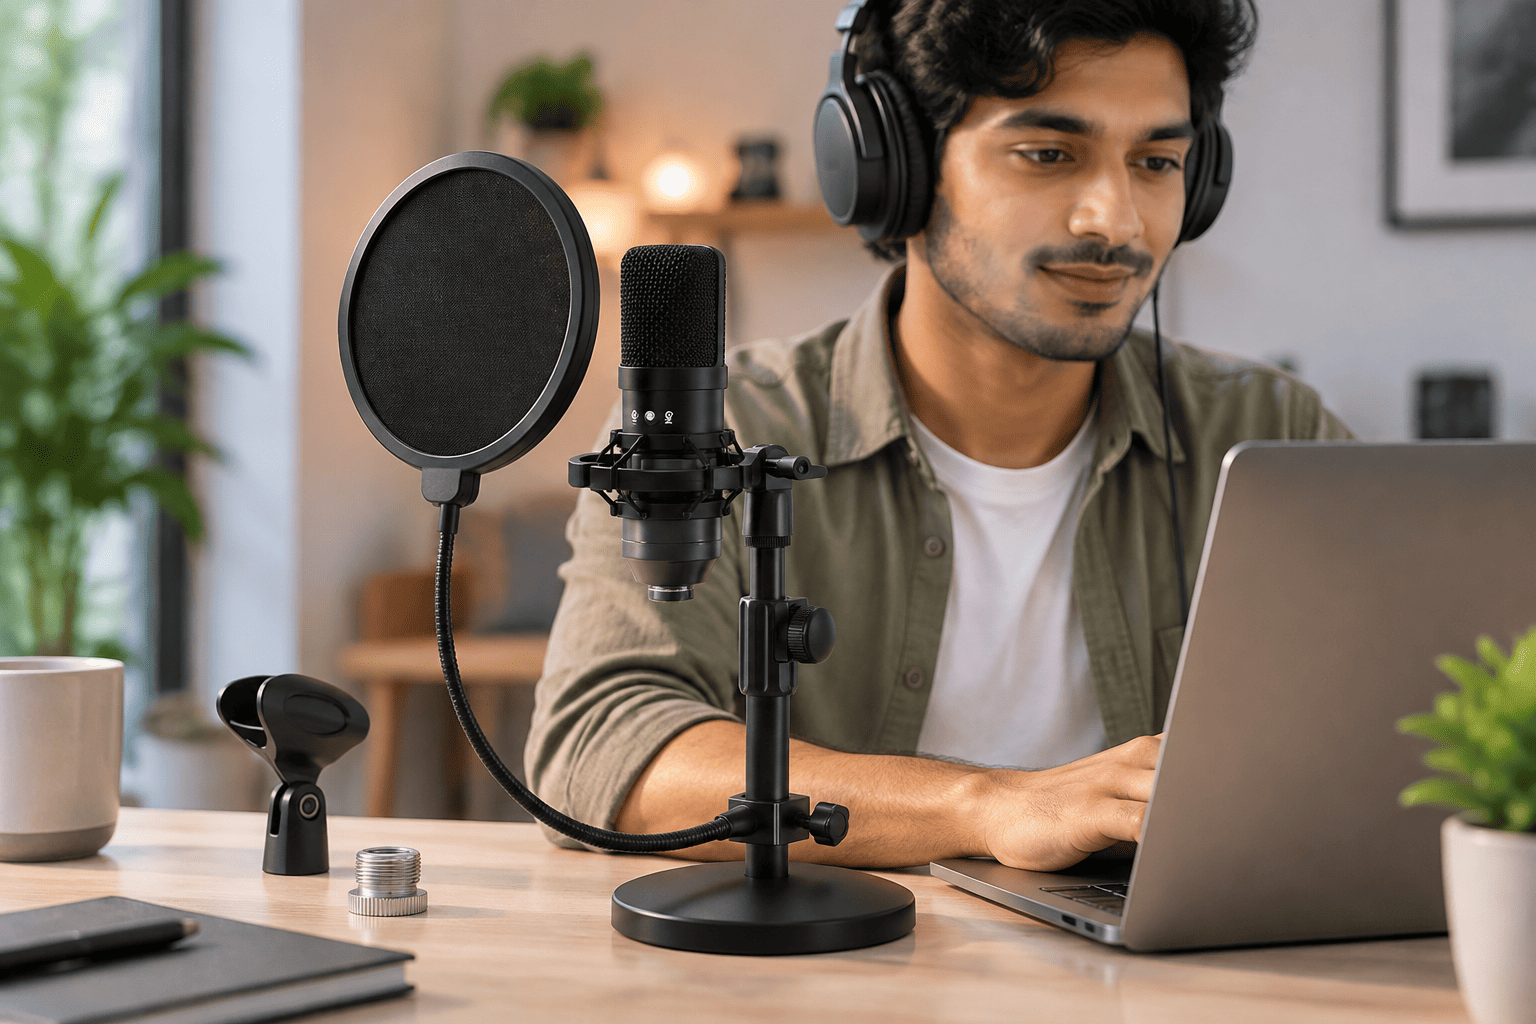
The BILIONE Versatile Desktop Microphone Stand is designed for creators who want a complete microphone stand setup without buying multiple accessories separately.
It comes with several useful components, including a microphone stand, shock mount, pop filter, microphone clip, and adapter.
For beginners building a podcast, streaming, or YouTube setup, having these accessories together makes the setup process much easier.
The biggest advantage of this stand is convenience. You can create a functional recording setup without needing to search for separate parts.
Key features and everyday benefits:
- All-in-one microphone kit:
The package includes a desktop stand, shock mount, pop filter, microphone clip, and adapter, making it suitable for beginners. - Weighted metal base:
The 1.5-pound base helps keep the stand stable during recording. - Adjustable height design:
You can position the microphone at a comfortable level depending on your desk setup. - Double-layer pop filter:
The two-screen design helps reduce air bursts from speech sounds like “P” and “B.” - Shock mount protection:
The shock mount helps reduce vibrations traveling into the microphone. - Wide compatibility:
The included 3/8-inch to 5/8-inch adapter allows compatibility with many popular microphones. - Compact desktop design:
It works well for smaller desks where a full boom arm setup may not be practical.
Price and who it’s for
At the supplied price of $21.99, the BILIONE desktop stand is a practical option for beginners and creators who want an affordable starting setup.
I would recommend it for podcast beginners, online teachers, streamers, and YouTubers who record from a fixed desk location.
It is a good choice if you want a simple setup that includes the essential accessories.
If you need maximum flexibility and want your microphone floating above your desk, a boom arm may be a better option.
2
InnoGear Microphone Stand Boom Arm: Better Flexibility for Streaming and Serious Setups
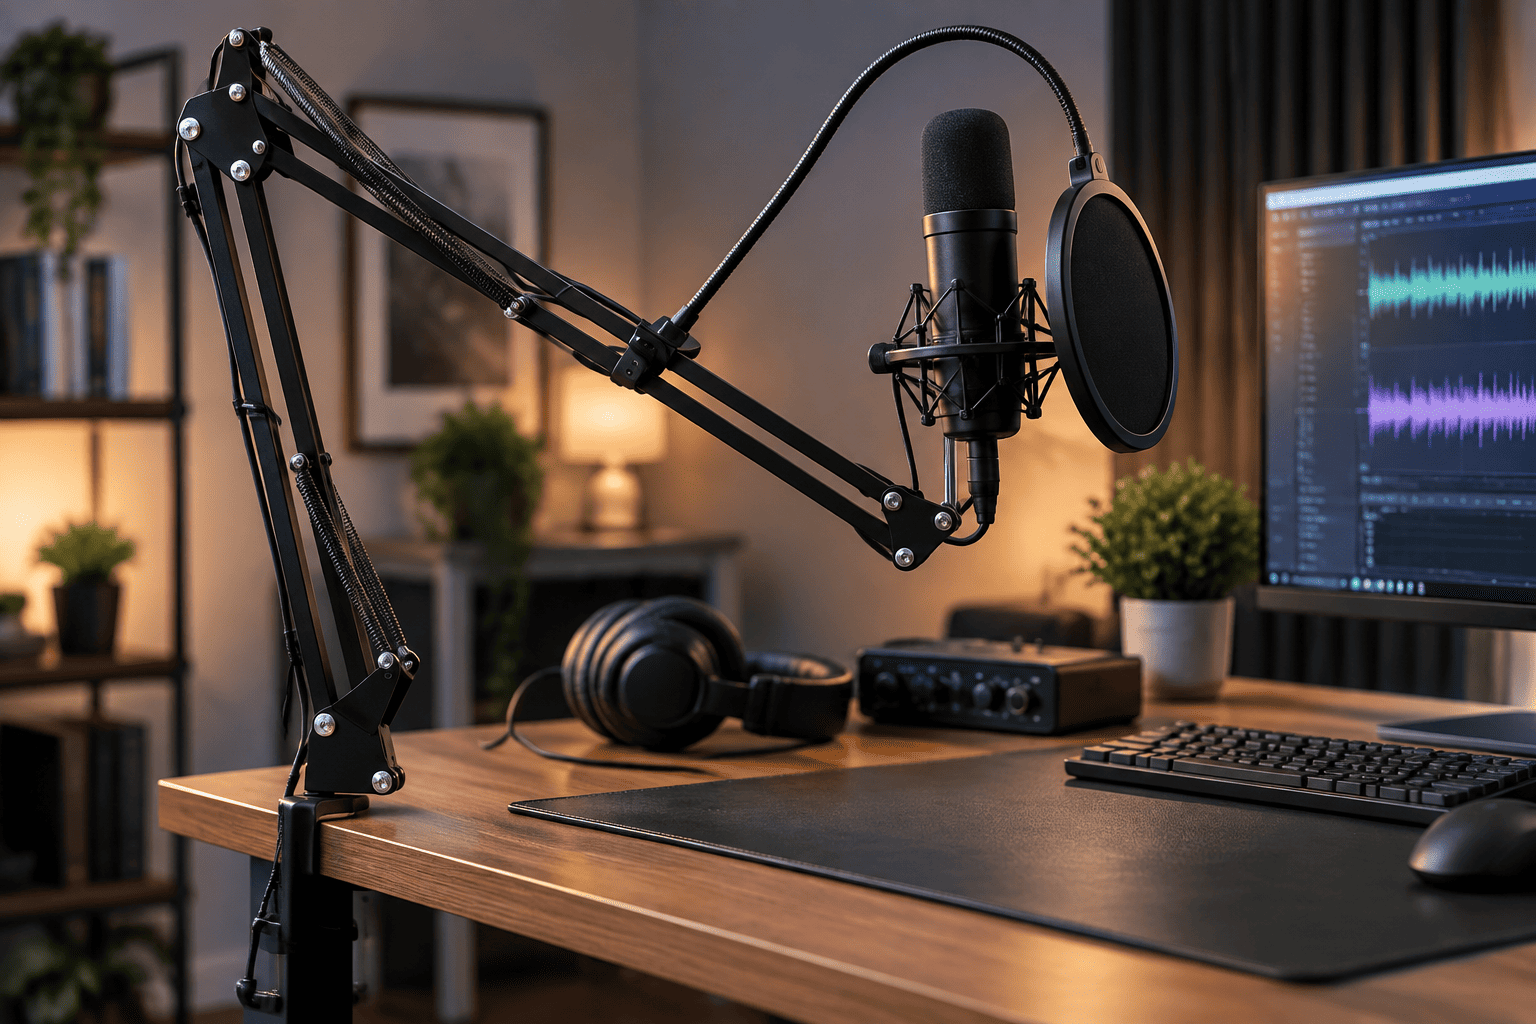
The InnoGear Microphone Stand Boom Arm is designed for creators who want more flexibility from their microphone setup.
Unlike a traditional desktop stand, this boom arm attaches to your desk and allows you to move the microphone closer or further away depending on your needs.
This style is popular among streamers and content creators because it keeps the desk area cleaner while giving more control over microphone placement.
The adjustable design makes it easier to create a comfortable recording position.
Key features and everyday benefits:
- Desk clamp mounting:
The clamp attaches securely to the desk and saves space compared with a traditional microphone base. - Adjustable boom arm design:
You can move the microphone into position while recording and move it away when finished. - Strong spring structure:
The reinforced arm helps support compatible microphones while reducing unwanted movement. - Shock mount included:
The included shock mount helps reduce vibration noise during recording. - Double-screen pop filter:
The included pop filter helps reduce harsh air sounds from speech. - Wide microphone compatibility:
The stand supports many popular microphone models with standard adapters. - Cable management accessories:
Included cable ties help keep your setup cleaner.
Price and who it’s for
At the supplied price of $24.99, the InnoGear boom arm offers more flexibility than a basic desktop stand while remaining affordable.
I would recommend it for streamers, podcasters, YouTubers, and anyone who spends a lot of time recording at a desk.
It is especially useful if you want a cleaner workspace and the ability to quickly adjust your microphone position.
For occasional recording or smaller desks, the BILIONE desktop stand may be enough.
Final Steps for a Better Microphone Setup
A good microphone setup does not require expensive equipment. It requires the right placement, correct settings, and a setup that fits your workflow.
Before recording, remember these basics:
- Keep the microphone close to your mouth.
- Adjust gain carefully.
- Use a pop filter when needed.
- Reduce vibrations with a shock mount.
- Test your audio before important recordings.
- Keep your recording space as quiet as possible.
The BILIONE Desktop Microphone Stand is a good choice for beginners who want a simple and affordable setup with essential accessories included.
The InnoGear Boom Arm is better for creators who stream regularly or want more flexibility from their desk setup.
Your microphone is the tool that carries your voice to your audience. Setting it up correctly is what helps that voice sound clear, natural, and professional.